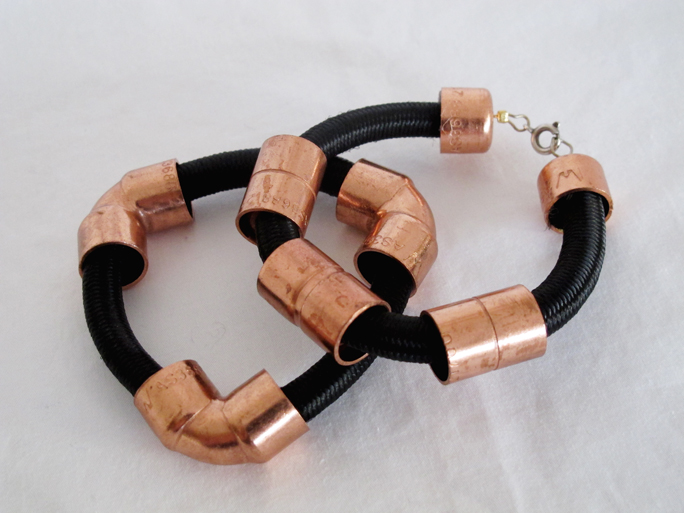
Here's a quick look at a DIY piece I made not long ago. It's made from copper wire I found at the hardware store using the same method as the twisted wire rings seen in this post, the shape reminds me of a delicious pretzel! Super easy to do and it makes a nice edition to my growing copper jewellery collection.
Showing posts with label jewellery. Show all posts
Thursday, July 26, 2012
Wednesday, July 18, 2012
leather love
I was traipsing around my wardrobe, still thinking about bomber jackets from my last post, and came across this leather one I've had for years. It was a big chunky bomber with a hideous belt and all around frumpy shape when I found it at my favourite op shop in Preston, it wasn't until not long ago that I found this pic on a street style blog of a girl in leather jacket with a curved cutout back and decided to try and replicate it with my manly bomber. I took the sleeves in, chopped the belt off and cut a semi-circle into the back and I think it's a pretty good makeover to be honest. It's still a hard piece to wear everyday so I've tried to put together something with a little of the badass attitude it deserves.. A very short skirt and my new 'Wangs'.
Now I know people are extremely opinionated when it comes to fakes, and I thought long and hard about how I'd feel wearing these phony heels, but when it came down to it I came up with these excuses; I currently am not in the position to afford real Wangs, these are extremely well-made/genuine leather blah blah blah, and I love the style (the Joan) so much that that is what mattered most. It's not like I'm going to go around telling people they're real, because that is totes not cool (totes wang?!) and I would feel like a genuine idiot. So thank you iOffer and the dodgy factory in China that produced these beauties! They will be sexing up lots of outfits for a long time to come :)
[Wearing: thrifted/DIY leather bomber & skirt, Sportsgirl tee, heels from iOffer, DIY copper jewellery]
tags
Alexander Wang,
bangles,
bengal,
bomber jacket,
choker,
copper,
DIY,
heels,
jacket,
jewellery,
Joan,
Kirrily Johnston,
leather,
outfit,
rings,
skirt
Monday, July 9, 2012
for sale
I'm very excited to announce that I've just opened my Etsy shop! This little collection of painted skirts (and denim leggings) are up for sale as well as a couple of pieces of jewellery from my last post HERE. I'm in the process of putting lots more up so keep a look out.
Come visit my shop NOBIGTRUTH.ETSY.COM
You can also keep updated through my Facebook page http://www.facebook.com/nobigtruthblog
Friday, July 6, 2012
crafty copper
I'm having a crafty phase at the moment. I found a big bag of DIY to-dos stashed away in a spare room and decided I really needed to get on it before the metals started to rust! I've been experimenting with twisting and plaiting copper wire, with surprisingly lovely results comprising of delicate friendship bracelets, fine rings and coiled cuffs. It's actually quite amazing what you can do with a bit of cable wire and tap fittings from the hardware store, although lucky for me I have a treasure trove in my garage thanks to a handyman dad. I can basically describe the sort of thing I want (tools, perspex, wire, washers, etc..) and he will pluck it out of the huge abyss of junk that is 'the shed'!
My favourites have got to be the bright copper coupling and black cord bangles using the same materials as my DIY Kirrily Johnston Bengal choker that I made in late last year, as well as the delicate adjustable coiled rings that can be stacked on your fingers in any combination. Copper is such a nice change from silver or gold and it goes with just about anything.
I'll be selling some of these pieces on my new Etsy store (along with my clothing designs) so be sure to keep a look out for it when I open!
tags
bangles,
bengal,
bracelet,
braided,
choker,
copper,
DIY,
friendship bracelet,
jewellery,
Kirrily Johnston,
plaited,
rings,
silver
Sunday, April 8, 2012
splatter skirt
My latest DIY involved reviving this nursey-looking navy blue pencil skirt I bought years ago from an op shop with the full intent of doing something creative with it. I went into this insane painting phase after getting all Van Gogh on my jeans in my last DIY HERE, and now I see a vast majority of my wardrobe as having the potential to look amazing if I splashed some paint on it! These urges must be reined in though, or else I will end up looking like a walking canvas (that a 2 year old painted).
So I promised myself this will be the last garment I paint for a while now. I started off with an ocean greeny-blue background and went a bit Jackson Pollock over the top of it. Unfortunately some of the white splatters look a lot like a bird pooped on it, but that's just the price you pay for being an inexperienced paint-flicker.
Wearing with: Asos top and boots, necklace from Vietnam, vintage ring and bracelet
Saturday, April 7, 2012
the faraway tree
I've been wanting somewhere to hang my more delicate jewellery on for a while now. I have this big empty wall in my room which was crying out for some attention so yesterday I finally got around to making my own jewellery tree. It's the perfect way to display my favourite pieces and create a feature out of what is essentially an old branch! Not to mention the fact that it cost me ZERO DOLLARS, considering what you can pay for some of those flat pack cardboard trees I reckon I did pretty well.
The important part is getting the right branch! I scoured my local park after a very windy day and found a heap of great branches from gum trees and paperbarks. It was hard choosing just one branch as they all had elements that I really liked, but I settled on this paperbark one which has 3 main 'prongs' (if that's what you call them?) and a fantastic, almost right angle, in it. It had heaps of spindly twigs on the outermost branches that wouldn't of been able to hold anything up so I cut off most of them, leaving a few interesting twigs for visual impact. It was really hard to know what to leave and what to prune to keep the whole thing looking fairly natural. After pruning I smoothed it down with sandpaper to get rid of any loose bark and naughty spiders lurking about, then, with the help of my handy-man father, found a piece of wood for the base and drilled a hole in it to fit the branch. The hole had to be on one side to counter-balance the sharp angle of the branch, adding to the asymmetry of the whole piece.
I was going to spray-paint the tree and base white, but decided against it when my dad told me I would probably need more than one coat of paint... Laziness prevailed, but I stand by the benefits of leaving a piece of nature in it's natural state because I love how organic it looks.
Tuesday, December 13, 2011
copper dreams
Obsessed with the newest addition to my necklace collection; Kirrily Johnston inspired bengal choker (see tutorial HERE!) I think it goes so nicely with this terracotta pleated dress.
Wearing with Asos dress, Topshop Ambush boots and DIY leather belt
Monday, December 12, 2011
kirrily bengal choker DIY tutorial
What you need:
5 copper capillary couplings (I used 20mm ones but you can either go bigger or smaller, like the three 15mm ones shown here, depending on what look you want)
2 copper capillary end caps (the same width to match your couplings)
Metal polish (I used Brasso)
Earring hooks, clip fastening, jump rings
Clear gloss spray paint (can be either enamel or acrylic)
Minuscule drill (to make holes in the end caps)
Jeweller's pliers and clippers
Scissors
About 2m of black shock cord
Thick cotton thread
Hot glue gun
(Materials sourced from Bunnings Warehouse and jewellery supplies stores)
Start by polishing up all your copper using the metal polish and an old cloth rag, wear gloves otherwise you will have black hands. Once they are all shiny and nice, spray all pieces with the clear gloss paint, this protects the copper's shine and stops it from discolouring (copper goes green with age). Give the copper several coats (making sure you spray from a distance or else the paint will form drips).
Drill a small hole in the centre of each end cap (the hole shouldn't be much wider than the earring hook wire you will be feeding through them).
To make the end caps:
Thread through your earring hook so the wire is poking through the outside. Thread on a little metal bead (not sure what you call these things exactly). Using the pliers, twist the wire around to form a small loop, cut the excess wire and nestle the cut end into the metal bead so you can't see it.
Attach a jump ring. Repeat these steps with the other end cap.
On one of the end caps, attach the fastening clasp (these things also have a name I'm unaware of!).
Get your shock cord and measure it around your neck to the length you want. I used large couplings and needed 3 widths of the fatest shock cord I could find. Cut three pieces of cord all at the length you want.
To whip the ends: wrap the ends of the shock cord in your cotton thread to bind them together. Trim the ends. I also used a lighter to melt the ends of the cord so they wouldn't fray, but be careful not to set the rubber inside the cord or your cotton thread alight!
Make sure your glue gun is extremely hot and place a blob of glue on the end of the cords and immediately push on the end cap, holding tight until the glue has cooled (don't put the glue in the end cap because it will squish out and make a mess when you push in the cord).
Repeat on the other side.
Voila! There you have a beautiful statement necklace, a near replica of Kirrily Johnston's Bengal Choker, at a tiny fraction of the cost!
DIY Bengal bracelet coming soon
Subscribe to:
Posts (Atom)